Terrain Paint Tab
The Terrain Paint tab (represented by the mountain icon with a paintbrush in the side toolbar) is a complete surface texturing environment for map creators.
It enables painting terrain surfaces using OMSI materials, filling irregular polygons (fields, plazas, parking lots) with textures, configuring layer blend properties, and downloading and displaying satellite orthophotos directly on the terrain surface.
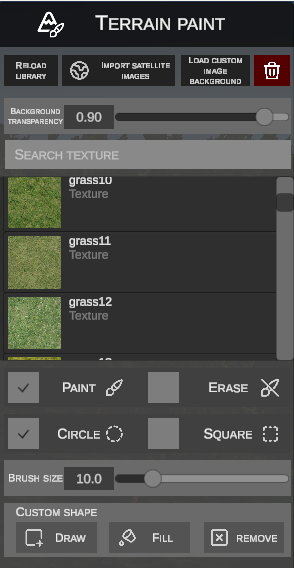
1. Top Bar and Background Management
The header of the side panel hosts library and aerial background utilities:
- RELOAD LIBRARY – refreshes the local texture cache detected in
OMSI 2/Texturewithout requiring an application restart. - IMPORT SATELLITE IMAGES (globe icon) – opens the satellite imagery downloader dialog.
- LOAD CUSTOM IMAGE BACKGROUND – opens a dialog to import custom image files from disk as a tile background.
- Red Trash Button – permanently deletes the satellite background image from the currently selected terrain tile.
Background Transparency
- Slider and numeric input (range
0.00to1.00, e.g.,0.90):- Smoothly adjusts the opacity of the satellite underlay.
- Enables simultaneous viewing of aerial photography (roads, buildings, trees) alongside painted ground textures, drastically accelerating accurate real-world reconstruction.
2. Texture Library and Search
Located beneath the transparency slider is the library of all available terrain textures:
- SEARCH TEXTURE input – dynamic search filter matching filenames and keywords (e.g.,
grass,asf,polbruk,sand). - Thumbnail tile list – displays material names and visual texture previews.
- Drag & Drop: You can drag any texture directly onto the bottom ACTIVE LAYERS bar to register it as a new active layer on the tile.
3. Painting Modes and Brush Settings
The lower side panel controls brush behavior:
A. Working Modes
- PAINT (brush icon) – paints the active texture from the bottom bar onto the terrain while holding LMB.
- ERASE (eraser icon) – erases the selected texture layer, revealing underlying textures.
B. Brush Shape
- CIRCLE – circular brush with soft radial tonal falloff (ideal for natural blending of grass, verges, and dirt).
- SQUARE – square brush (useful for crisp boundaries along pavement, curbs, and asphalt).
C. Brush Size
- Slider and numeric input defining brush radius in meters (e.g.,
10.0).
4. Custom Shape Tool
The CUSTOM SHAPE section allows instant texturing of large polygonal regions (such as agricultural fields, parking lots, or depot aprons) without manual brush strokes:
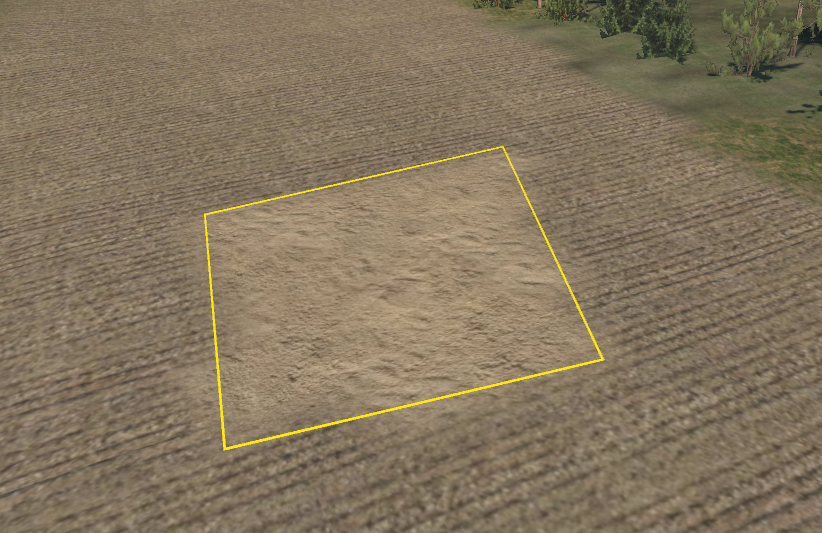
| Button | Function |
|---|---|
| DRAW | Activates boundary drawing mode. Click LMB across the terrain to place polygon vertices connected by yellow guidelines. Clicking near the starting point or pressing Enter closes the polygon. |
| FILL | Instantly floods the interior of the closed polygon with the currently selected texture layer. |
| REMOVE | Clears the drawn guide boundary from the scene. |
5. Active Layers Bar
A horizontal bar across the bottom of the screen displays all texture layers registered on the currently edited tile:

Layer Management:
- Selecting Active Texture: Click LMB on a layer slot thumbnail (e.g.,
1. grass,3. beton asf) to make it the active texture for brush painting or shape filling. - Deleting a Layer: Drag & drop any layer thumbnail directly over the trash can icon on the right to remove that layer from the tile.
- Editing Layer Parameters (EDIT LAYER): Select a layer and click EDIT LAYER (or Right-Click on it) to open the configuration dialog:
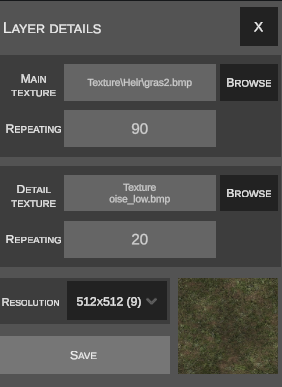
- Main Texture: path to the base texture file and the Repeating parameter (terrain tiling frequency).
- Detail Texture: optional detail texture (dirt, noise, grain) and its tiling multiplier.
- Resolution: splat weight map resolution chosen in powers of two (
1x1to1024x1024). - Real-time Preview: displays a live rendering of the blended material.
Saving Changes
To apply changes made in this dialog, you must click the Save button.
6. Importing Satellite Imagery (Import satellite images)
The import window fetches high-resolution orthophotos and applies them as tile underlays:
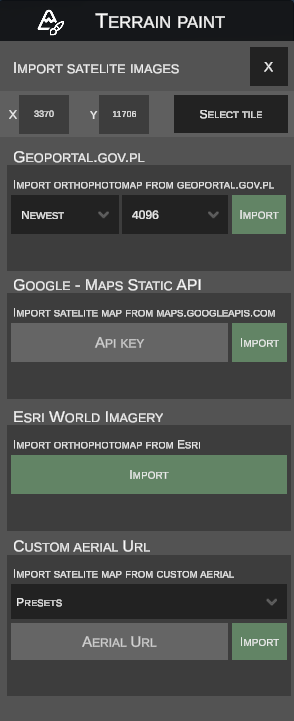
Tile Selection Procedure:
- The X and Y fields display the sector coordinates.
- Click SELECT TILE and click on any tile in the scene to target it.
Available Imagery Providers:
- Coverage: Poland (highest resolution aerial orthophotos).
- Vintage: Choose between the latest imagery (Newest) or historical archives by year (invaluable for recreating historical maps).
- Resolution: Output texture size selection (
512to4096pixels). - Usage: Click IMPORT.
- Coverage: Worldwide Google Maps satellite imagery.
- Requirements: Requires your own API key entered in the API KEY field.
- Usage: Click IMPORT.
- Coverage: High-resolution global satellite imagery from Esri.
- Requirements: Completely free; requires no API key.
- Usage: Click IMPORT.
- Coverage: Custom tile servers (WMS / TMS / XYZ).
- Presets: Dropdown list of popular map providers (PRESETS).
- Custom URL: AERIAL URL field accepts custom tile URL templates with
{z}/{x}/{y}parameters. - Usage: Confirm by clicking IMPORT.
7. Loading Custom Images from Disk (Load custom image)
If you have custom background imagery (such as city planning exports, historical surveys, or CAD design blueprints), you can load them directly:
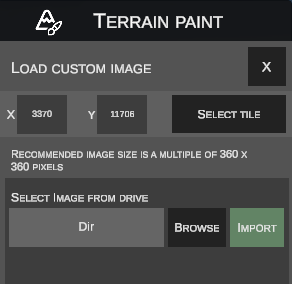
- Select the target tile using SELECT TILE.
- Note the tile dimensions:
Recommended image size is a multiple of 360 x 360 pixels (OMSI tiles are square but may vary in dimensions. The dialog shows the exact pixel size of the active tile).
- Click BROWSE and select an image file on your drive (
.jpgor.png). - Click IMPORT – the editor binds the image as the tile underlay (
.aerial.jpg) and renders it on the terrain immediately.